Showing posts with label pouch. Show all posts

Wednesday, 11 March 2015

A journey

11March 2015


Round 1: Chain 4, 12 dc in 4th chain from hook, join with slip stitch, chain 3


Round 2: 2 dc in the same stitch as chain 3 earlier, 


Round2: increasing  (2dc in each stitch), join with sl st, chain 3

 Round 3: (2dc in same stitch with ch 3, dc in next stch) * repeat *, join with sl st, ch 3


Round 4: (2 dc in same chain 3 stitch, dc in next 6 st)* repeat, 2dc in last stitch. 

(To be continued)


Tuesday, 5 June 2012

Coin pouch

Assalamualaikum wb...

A friend of mine was complaining that she cant find coin for change because her purse doesnt have coin compartment.

I promised her to whip a coin pouch to keep her change.

So, tonight after completing my gourd pouch, I started making the coin pouch.

Using the same lime green yarn, I rely totally on my own imagination.

The base is

chain 4,
11dc in first stitch, join row
Chain 3, 2 dc in each stitch, join row
Chain 3, dc in same st,* (dc i next sti, 2 dc in nxt st) repeat *, join row
Chain 3, dc in same stitch, *(dc in next 2 st, 2 dc in nxt st), repeat *, join round

Will try to recall the pattern for body in next entry, In shaa Allah.

At first I used blue yarn as string but after second thought, I think red would add more vibrant.

Is it so?


Bitter Gourd Pouch

Assalamualaikum wb...

Still in pouch mode.

Now,  anytime I want to crochet, I will just pick the yarn and needle and start to crochet. By this, I would be able to start with something.

Planning for certain magnificent and super wonderful project and to look for the pattern in internet would ended up with no project at all.

 This one I think would be completed very soon. Mini project like this can be done when I am in the middle of doing other things with family. Not much focus is needed to do it and therefore I still can talk to the kids and have conversations with my better half .


Wip- hp pouch by ummufatihah

Maybe I can call this Bitter Gourd Pouch.. :) . Peria in Bahasa Melayu.

Friday, 1 June 2012

Nokia N8 Striped Pouch

Assalamualaikum wb.. 

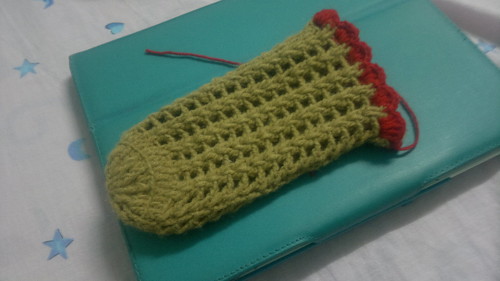
Today I made another pouch. This time I purposely made it for my Nokia N8. Even though I did not follow any specific pattern, but I am sure there are lot of similar pouches out there with patterns in the webs.

Nevertheless, I would capture my version of the pouch for my own future reference (and maybe a few others who happen to stumble upon my blog here.. ).

 
Base:
Make magic circle
chain 3 (first dc), stitch another 11 dc in the circle, join  the row (12 dc)
Chain 3, dc in same stitch, 2 dc in each stitch, join row (24 stitch)
Chain 3, *(2 dc in next stitch, dc in next stitch), repeat * until end of row, join row

Check the base with bottom of handphone. Make it  a little bit smaller than the hp, it will later getting bigger after a few more rows.


Body:

Change color
chain 3, dc in every stitch (maintaining the same stitch until you get the height that you need for your hp.

Mine reached after 12 even rows. Change the color based on your preference. I changed colour in alternate row because it was easier for me to maintain the same yarn without cutting them. I just brought back the next yarn which I left behind before the row.


When you reach the top part of the hp, decide whether you want the hp to be fully hidden or some what appear a little bit. I made my pouch exactly the same height (even though in fact mine is smaller) of my hp for easy retrieval and insert in. 

So, at after the 12 row (to fuly cover it shoould be 13 row plus edging) I start to make the edging. 

At row 13, *(slip stitch at first stitch.  Skip next stitch, 5 dc in next stitch, skip next stitch),  repeat * until end row.

To make the flap, 

There will be 4 flower edge at the back of the pouch. For row 14: sc in every stitch until you reach the middle of second flower at back part of the pouch. 

Chain around 5 stitch. Skip second half stitch of the same flower as well as the first part of the next flower. Sc the next stitch, chain 3, turn.

6dc in the space. chain 3, turn. Repeat the row until your desired length of the flap.

At the last row, turn, sc in each stitch. chain 10 or depends on what is the size of your button hole. Skip the whole stitch and sc in the last stitch in the row. 

Turn and sc in the space. Continue sc in end side of every row down to the beginning of the flap and on every stitch of the flowery edging until you reach the last stitch before end of row 14.

Now, we can start making the handle.


Chain 3 and make Foundation Double Crochet until you reach the desired length. Attach the handle to the other side of the pouch. 

(For Foundation Half Double Crochet, you can google lots of them from internet and try to apply the same concept to Foundation Double Crochet. I did found info about Foundation Double Crochet some time ago but cannot recall the site.)

 Turn and sc in each of the side of the Foundation Double Crochet until the beginning of the handle. Continue the sc until it reach the other side of the flap and sc up the flap. Slip stitch when it reach the first sc at the flap edge. Slip stitch and cut the yarn. Weave off.


As for the flower, with red yarn make a magic circle.


Chain 1 and stitch 5 or 6 sc inside the ring. Change color and join the round. Slip stitch, chain 3, slip stitch in next stitch. Repeat until you have 5 chain 3. 

Next round, slip stitch and 5 dc in the chain 3 space, slip stitch in next chain 3 space. Repeat at all the chain 3 space. Cut yarn with a few inch length of yarn left. Weave / tie the yarn loosely to the pouch.

-End-

I apologise for the difficulty to understand my write-up. My first time of complete write-up like this.

p/s: this is my second time write the entry actually. My first was not able to be published due to internet problem... Arrggghhh...


Monday, 28 May 2012

Simple Pouch


Assalamualaikum wb..

I think I can finish my crochet project faster if I didnt follow any pattern specifically...

This is the evidence. I was crocheting a set of flower (6 pieces) following a pattern from Whiskers & Wool. web. After 6 times crocheting the same pattern, I some sort of memorizing it in my mind.

I  was thinking of making a pouch for my  air-conditioner remote control which always MIA every time I need it.

So, using the pattern as the base, I just keep on maintaining the amount of stitch until it reach the right height.


Simple crochet pouch by ummufatihah


And I ended it up with flower pattern stitch which was also used in the original pattern.

Simple pouch by ummufatihah
My baby and the pouch


As we can see here, the front side and the back side were using different style. I was thinking that it would be more practical to make space at the front so that it would be easier to switch on/ off the control without taking it out of the pouch.

I used two double crochet in between double crochet stitch (*2 dc in dc  st), chain two , skip next 2 stitch, repeat * until it cover the front part of the remote control. When it reach the side, double crochet in each double crochet stitch until end of back side. Repeat every row until your intended height.

Then, start doing the row for inserting cord. This is done before the flowery stitch.  

For the front part, just maintain the same stitch as per previous row. For the back part, 2 double crochet in next stitch, chain two, skip 2 stitch. Repeat until end of back part.

Then only continue with the flowery part. Just follow the instruction from the original pattern here.

For the cord, make chain up to the length you want. Then insert in and out of the row before the flowery row. Cut the yarn with few inch longer. Weave the yarn with tapestry needle to the other end of the cord.

-End-

After some thinking, maybe I will use the pouch for my new Nokia N8. ;)

Have a good day, and be good.


Saturday, 3 March 2012

Stationery pouch wish list


Assalamualaikum wb...

Alhamdulillah, the new pouch has been handed over to the new owner.

Actually, hubby needs bigger pouch but wise enough not to reject the pouch.

So, he requested bigger pouch for next project to keep the rest of his items; mouse, pointer, pen drive and whatever else which could fit inside...

I already set on one easy project, as usual from the internet.

Hope to start off very soon but Maryam already booked for one angry bird pouch for her.

Let us see if mama can make it a reality.

Ouch, my finger still hurt.

Until then, let the feel good of completing my very first zipper project linger around a little bit longer...

Monday, 2 May 2011

rose pouch and sun hat

Assalamualaikum wb...


Percubaan kedua saya untuk menghasilkan sesuatu untuk Hari Guru anak2....

Yang ni konon2nya pouch bunga ros yang menggunakan pattern pineapple pouch tapi saya kecikkan saiz dia. Sesuai untuk telefon bimbit.


Yang ni pulak konon2nya sunhat yang saya reka berinspirasikan rose pouch tapi saya buat lebih besar dan bahagian bukaannya saya capahkan untuk menjadi penghadang cahaya matahari.


Sun hat ni masih dalam proses. Tengoklah nanti macam mana agaknya hasilnya. Yang ni pun dah berapa kali dileraikan dan buat semula. Kira Try and Error la nampaknya.

Saya cuba ke kepala Asiah tapi tak muat. Cuba ke kepala Syazwan yang berusia 6 bulan, dan nampaknya muat la pulak. Maknanya saiznya adalah untuk bayi sekitar 6 bulan. Tapi Syazwan tak boleh pakai sebab warna dan gayanya tak sesuai untuk bayi lelaki.

Untuk siapa?.... Tunggu... :)

Cukup untuk kali ni.

Salam.

Thursday, 28 April 2011

pineapple pouch

Assalamualaikum wb.

Tak lama lagi Hari Guru. Selalunya anak2 akan mintak belikan sesuatu untuk dihadiahkan kepada guru mereka.

Tiba2 saya terfikir, kenapa tak buat sendiri?.. :)

Saya belek2 buku ni untuk cari idea yang sesuai...


Ini dia contoh yang saya nak buat...


Yang ni interprem jer.. :)


Persediaan....


Dua benang; kuning dan hijau...


JArum 4.0 mm..


Hasilnya......


kosong....


dan bila digunakan..


Asasnya saya ikut buku dan lepas tu saya ikut fikiran...


Insya'Allah saya akan buatkan 2 atau 3 lagi versi yang berbeza.....

Tunggu...
Salam....

Mission Accomplished

  • Bigger Stationery Pouch (Hubby)
  • Pencil Pouch (Maryam)
  • Stylish Pen Case (Hubby)

My Card Making Blog List

My Blog List