Showing posts with label crochet. Show all posts

Wednesday, 11 March 2015

A journey

11March 2015


Round 1: Chain 4, 12 dc in 4th chain from hook, join with slip stitch, chain 3


Round 2: 2 dc in the same stitch as chain 3 earlier, 


Round2: increasing  (2dc in each stitch), join with sl st, chain 3

 Round 3: (2dc in same stitch with ch 3, dc in next stch) * repeat *, join with sl st, ch 3


Round 4: (2 dc in same chain 3 stitch, dc in next 6 st)* repeat, 2dc in last stitch. 

(To be continued)


Saturday, 17 November 2012

Granny square blanket- a journey

After 12 skein of yarns ..... And still a long way to go.... This is for my youngest girl, Asiah. Hooked with 4 mm crochet hook.


Wednesday, 19 September 2012

Here and there

Assalamualaikum wb...

A little bit here and there. An update.

Tuesday, 5 June 2012

Coin pouch

Assalamualaikum wb...

A friend of mine was complaining that she cant find coin for change because her purse doesnt have coin compartment.

I promised her to whip a coin pouch to keep her change.

So, tonight after completing my gourd pouch, I started making the coin pouch.

Using the same lime green yarn, I rely totally on my own imagination.

The base is

chain 4,
11dc in first stitch, join row
Chain 3, 2 dc in each stitch, join row
Chain 3, dc in same st,* (dc i next sti, 2 dc in nxt st) repeat *, join row
Chain 3, dc in same stitch, *(dc in next 2 st, 2 dc in nxt st), repeat *, join round

Will try to recall the pattern for body in next entry, In shaa Allah.

At first I used blue yarn as string but after second thought, I think red would add more vibrant.

Is it so?


Bitter Gourd Pouch

Assalamualaikum wb...

Still in pouch mode.

Now,  anytime I want to crochet, I will just pick the yarn and needle and start to crochet. By this, I would be able to start with something.

Planning for certain magnificent and super wonderful project and to look for the pattern in internet would ended up with no project at all.

 This one I think would be completed very soon. Mini project like this can be done when I am in the middle of doing other things with family. Not much focus is needed to do it and therefore I still can talk to the kids and have conversations with my better half .


Wip- hp pouch by ummufatihah

Maybe I can call this Bitter Gourd Pouch.. :) . Peria in Bahasa Melayu.

Sunday, 3 June 2012

Tumbler cozy (wip)


Assalamualaikum wb...

My husband and I love to spend our precious time together at Starbuck. And I love to keep the plastic tumbler. Its venti size is large enough to keep our tiny teeny stuff.

The problem is the company logo. I have read somewhere in the internet that it has its own story related to paganism.

So, I have plan to make tumbler cozy for my collection to hide the logo.

Recently, i have come across a pattern to make jar cozy. Applying the same principle, I started another crochet project.

Still in WIP mode.


Friday, 1 June 2012

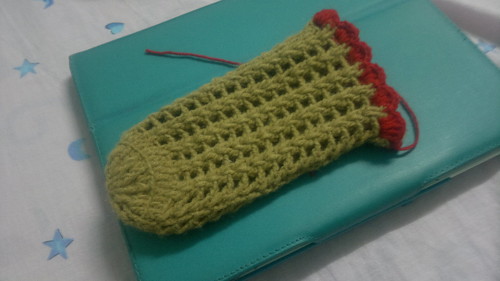
Nokia N8 Striped Pouch

Assalamualaikum wb.. 

Today I made another pouch. This time I purposely made it for my Nokia N8. Even though I did not follow any specific pattern, but I am sure there are lot of similar pouches out there with patterns in the webs.

Nevertheless, I would capture my version of the pouch for my own future reference (and maybe a few others who happen to stumble upon my blog here.. ).

 
Base:
Make magic circle
chain 3 (first dc), stitch another 11 dc in the circle, join  the row (12 dc)
Chain 3, dc in same stitch, 2 dc in each stitch, join row (24 stitch)
Chain 3, *(2 dc in next stitch, dc in next stitch), repeat * until end of row, join row

Check the base with bottom of handphone. Make it  a little bit smaller than the hp, it will later getting bigger after a few more rows.


Body:

Change color
chain 3, dc in every stitch (maintaining the same stitch until you get the height that you need for your hp.

Mine reached after 12 even rows. Change the color based on your preference. I changed colour in alternate row because it was easier for me to maintain the same yarn without cutting them. I just brought back the next yarn which I left behind before the row.


When you reach the top part of the hp, decide whether you want the hp to be fully hidden or some what appear a little bit. I made my pouch exactly the same height (even though in fact mine is smaller) of my hp for easy retrieval and insert in. 

So, at after the 12 row (to fuly cover it shoould be 13 row plus edging) I start to make the edging. 

At row 13, *(slip stitch at first stitch.  Skip next stitch, 5 dc in next stitch, skip next stitch),  repeat * until end row.

To make the flap, 

There will be 4 flower edge at the back of the pouch. For row 14: sc in every stitch until you reach the middle of second flower at back part of the pouch. 

Chain around 5 stitch. Skip second half stitch of the same flower as well as the first part of the next flower. Sc the next stitch, chain 3, turn.

6dc in the space. chain 3, turn. Repeat the row until your desired length of the flap.

At the last row, turn, sc in each stitch. chain 10 or depends on what is the size of your button hole. Skip the whole stitch and sc in the last stitch in the row. 

Turn and sc in the space. Continue sc in end side of every row down to the beginning of the flap and on every stitch of the flowery edging until you reach the last stitch before end of row 14.

Now, we can start making the handle.


Chain 3 and make Foundation Double Crochet until you reach the desired length. Attach the handle to the other side of the pouch. 

(For Foundation Half Double Crochet, you can google lots of them from internet and try to apply the same concept to Foundation Double Crochet. I did found info about Foundation Double Crochet some time ago but cannot recall the site.)

 Turn and sc in each of the side of the Foundation Double Crochet until the beginning of the handle. Continue the sc until it reach the other side of the flap and sc up the flap. Slip stitch when it reach the first sc at the flap edge. Slip stitch and cut the yarn. Weave off.


As for the flower, with red yarn make a magic circle.


Chain 1 and stitch 5 or 6 sc inside the ring. Change color and join the round. Slip stitch, chain 3, slip stitch in next stitch. Repeat until you have 5 chain 3. 

Next round, slip stitch and 5 dc in the chain 3 space, slip stitch in next chain 3 space. Repeat at all the chain 3 space. Cut yarn with a few inch length of yarn left. Weave / tie the yarn loosely to the pouch.

-End-

I apologise for the difficulty to understand my write-up. My first time of complete write-up like this.

p/s: this is my second time write the entry actually. My first was not able to be published due to internet problem... Arrggghhh...


Monday, 28 May 2012

Simple Pouch


Assalamualaikum wb..

I think I can finish my crochet project faster if I didnt follow any pattern specifically...

This is the evidence. I was crocheting a set of flower (6 pieces) following a pattern from Whiskers & Wool. web. After 6 times crocheting the same pattern, I some sort of memorizing it in my mind.

I  was thinking of making a pouch for my  air-conditioner remote control which always MIA every time I need it.

So, using the pattern as the base, I just keep on maintaining the amount of stitch until it reach the right height.


Simple crochet pouch by ummufatihah


And I ended it up with flower pattern stitch which was also used in the original pattern.

Simple pouch by ummufatihah
My baby and the pouch


As we can see here, the front side and the back side were using different style. I was thinking that it would be more practical to make space at the front so that it would be easier to switch on/ off the control without taking it out of the pouch.

I used two double crochet in between double crochet stitch (*2 dc in dc  st), chain two , skip next 2 stitch, repeat * until it cover the front part of the remote control. When it reach the side, double crochet in each double crochet stitch until end of back side. Repeat every row until your intended height.

Then, start doing the row for inserting cord. This is done before the flowery stitch.  

For the front part, just maintain the same stitch as per previous row. For the back part, 2 double crochet in next stitch, chain two, skip 2 stitch. Repeat until end of back part.

Then only continue with the flowery part. Just follow the instruction from the original pattern here.

For the cord, make chain up to the length you want. Then insert in and out of the row before the flowery row. Cut the yarn with few inch longer. Weave the yarn with tapestry needle to the other end of the cord.

-End-

After some thinking, maybe I will use the pouch for my new Nokia N8. ;)

Have a good day, and be good.


Friday, 18 May 2012

Futomaki

Assalamualaikum wb...

Tomorrow, my eldest, Fatihah is invited to attend her classmate birthday.

I crocheted japanese food, futomaki(according to the book) as keychain holder charm.


Wednesday, 16 May 2012

Natural goodness


Assalamualaikum wb...

Alhamdulillah, I managed to complete all the 'order' made by the girls for their teachers; two crocheted mini cakes, two felt donuts, a crocheted sushi and a felt froggie apllique. All are keychain holders.

The last item was completed at the very night before Teacher's Day, and I was rushing doing the packaging and ribbon stuff that I didnt manage to take any photo.

It seems the teachers stuff broughr the passion for crochet back ( for the moment).

So, I am whipping some healthy food.

Maybe for dinner....;)


Sunday, 13 May 2012

Salmon nagiri


Assalamualaikum wb.

One more item to be added to Teacher's Day gifts collection.

Special request by my eldest girl, Fatihah. Pattern from my crochet book, Yummi' Gurumi by Christen Haden& Mariarosa Sala.


And guess what... I've stumbled upon the author  (Christen Haden)  crochet blog, NeedleNoodle on my craft bloghop session.

We never knew when we are so lucky... :)

Saturday, 12 May 2012

Sweet tooth


Assalamualaikum wb...

Two of my girls are already in school. Teacher's Day is coming and they expect me to whip something for their teachers.

So, i have few days to come up with something. I have some ideas copied from the internet but still wip.

Come across cuty stuff in my crochet book and think it would be a little bit differrent and sweet...;)

Come and take a look....(the picture quality is not very good)

Friday, 11 May 2012

I can't see


Help!!!!

I can't see.

Am I going to have my own eyes very soon?

Wednesday, 26 October 2011

Hello Kitten

 Assalamualaikum wb...

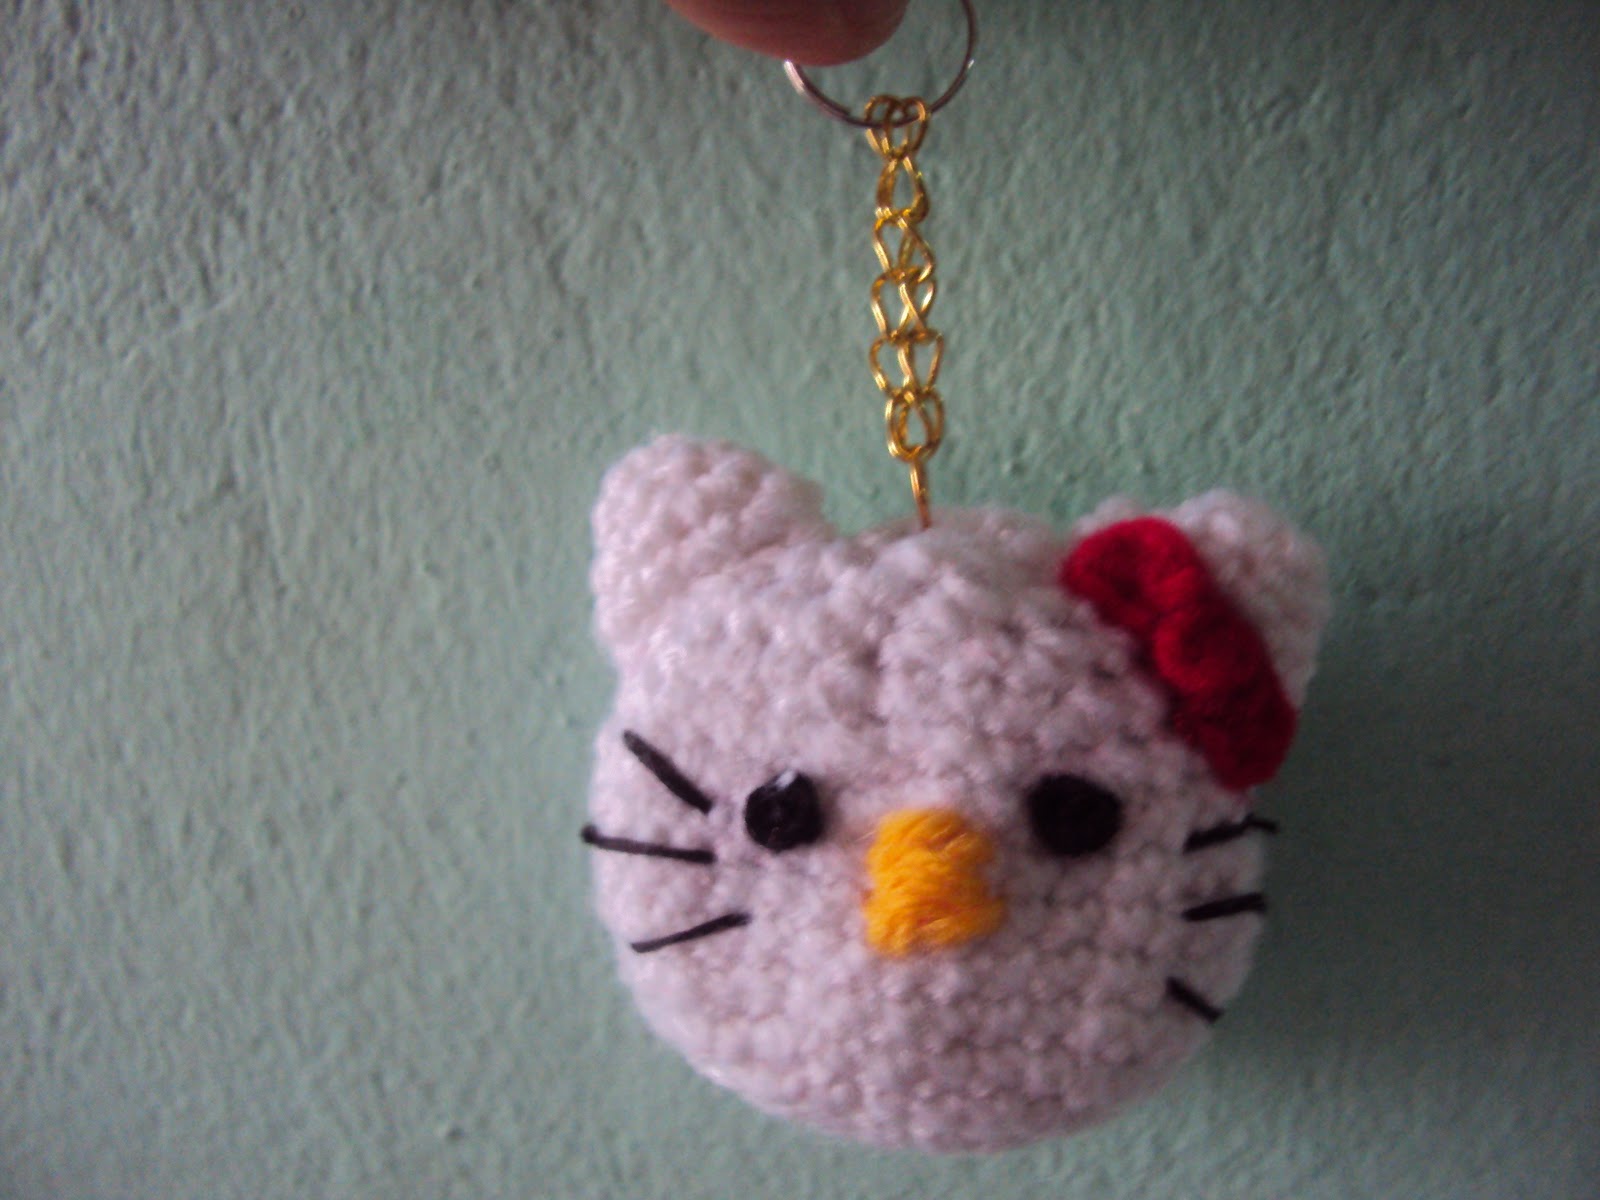
Kali ni cuba pulak nak buat Hello Kitten. Saya ikut free pattern kat internet.  Saya save file pdf hari tu dan lupa pulak nak ambik link. Search balik dalam internet tak jumpa pulak address dia. Nanti kalau dah jumpa saya masukkan kat sini. Pattern ni memang dijamin cantik terutama bahagian telinganya. Klik kat sini kalau nak dapatkan pattern dalam bentuk pdf.

Sepatutnya ni adalah fridgie, tapi saya rasa sayang pulak nak jadikan fridgie. Tu yang saya buat keychain. Untuk rujukan saya, pattern untuk buat telinga dia memang sesuai untuk telinga Hello Kitten ni.

Ikut pattern, mata dia guna black bead tapi saya potong guna kain felt hitam dan jahit terus benang hitam dia jadi misai. Hidung guna benang kait warna kuning. Riben pulak guna felt merah dijahit ke kepala kucing tu.

Untuk  menjadikan bentuk dia leper, (kat dalam gambar tak dapat bezakan sangat), saya masukkan kotak yang digunting ikut bentuk kepala tu dua keping sebelum ditutup kaitan tu.

Sebenarnya memang dah lama saya nak buat kepala kucing ni sebab comel sangat tapi belum ada keyakinan nak buat banyak sangat benda hiasan kucing tu. Jadi, untuk percubaan pertama ni, saya puas hati.

Dan seperti biasa prototype saya ni akan menjadi hakmilik kekal Asiah. Sebaik je siap, benda2 tu akan terus berada di genggamannya. Hello Kitten ni dia dah siap bawak main basikal kat depan rumah. Dah lah benang  tu putih. Dah nak kelabu dan saya tengok.

Jumpa lagi.

Kemaskini dengan pautan pattern pada 27/10/2011

Tuesday, 25 October 2011

Benang tiga warna- Crochet

Assalamualaikum wb..

Saya kerap benar mulakan projek crochet yang tak siap2. Sebabnya ialah, saya mudah jemu.

Jadi saya fikir2 macamana nak buat projek kita kait sekejap je dah besar. Sebab kalau kecik lama sangat, tu yang buat saya jemu. Kalau tengok projek tu dah nampak bentuknya, semangat sikit nak teruskan.

Fikir punya fikir, saya rasa kalau pakai benang besar mesti cepat projek tu besar. Tapi saya tak ada benang yang besar. penyelesaiannya, saya capai tiga benang dan cari jarum saiz besar. Saya pakai redah je tanpa rancang saya nak buat apa.

Benang tiga warna; merah coklat dan biru saya kaitkan secara spiral. Guna jarum 8 mm.
  Hasilnya setakat ni.....

 Benang ungu tu saya jadikan marker untuk kira pusingan dia.

 Nanti kita tengok apa yang jadi.. (Kalau jadi lah... :)

Seterusnya saya cuba buat projek amigurumi berdasarkan buku crochet ni; saya perolehi dari MPH. Kalau pembelian macam ni memang saya anggap rezeki sebab sangat sukar nak tengok buku2 macam ni kat kedai buku tempatan.

Comel kan gambar2 dia...
Ni salah satu dari projek dalam buku tu...

Saya pilih yang saya rasa paling mudah.. Jadi, saya pilih bear yang comel ni..

Ni dia bear yang masih "Work in Progress"
Jumpa lagi dan selamat berkreatif...

Monday, 17 October 2011

Kepala Bear Crochet

 Assalamualaikum wb..

Saya nak kongsi hasil crochet yang berjaya saya selesaikan hujung minggu lepas. Pattern dia saya dapat dari sini, All About Ami.


Ini bukan kali pertama saya cuba buat kepala beruang ni. Saya dah pernah buat dulu2 waktu saya mula berjinak2 kembali dengan dunia crochet.

Percubaan pertama.


Sekarang bila dah yakin sikit, saya nak cuba buat betul2..
Dah nak siap. Masukkan isian lembut sebelum ditutp sepenuhnya.
Untuk stuffing ni, saya masukkan juga perca lebihan kain jahitan. Tu yang buat dia lebih padat berbanding kepala bear yang saya buat sebelum ni.
Dah padat, tutup sepenuhnya dan gunting lebihan benang

Nampak cantik je bentuk bulat dia kan... Mungkin sebab perca kain tu kot.
Bila sampai bahagian nak jahit telinga ni, saya mula gelabah. Tak tahu macamana nak jahit supaya  nampak macam contoh di laman web tu. Saya godek2 youtube dan jumpalah klip video ni  Making Bear Ear. Alhamdulillah berjaya.

Hasilnya....


Mata tu sepatutnya guna safety eye yanh khas untuk plush toy/ softies. Saya memang ada benda ni, tapi tak dapat pakai. Tak tahu la memang benda tu bermasalah atau saya yang tak pandai pakai. Lepas tu saya nak pakai wiggle eye, tapi bila nak pasang, kecil sangat macam tak sesuai lah pulak. Akhirnya saya buat jahit silang je guna benang kait warna hitam. Fatihah kata macam bear dah mati. :)


Saya letak dua2 versi bear bersebelahan.. Ada perbezaan tak?..


Lepas tu saya pasang jump ring kat kepala tu, sambungkan rantai dan masukkan jump ring besar..

Tadaaa....


Rantai Kunci Kepala Bear
Selamat mencuba..


Thursday, 13 October 2011

Hadiah Harijadi Kawan Sekolah Fatihah

Assalamualaikum wb..

Fatihah dah sound cakap kawan dia birthday tak lama lagi. Nak saya sediakan hadiah. Sekarang ni dia pantang tengok saya godek2 kraf sikit, mula tanya untuk dia ke?.. :)

Saya pun tak tahu nak buatkan apa sebagai hadiah kepada kawan Fatihah. Sebenarnya saya memang galakkan Fatihah hadiahkan barangan buatan sendiri apabila memerlukan menyediakan hadiah. Kalau tak pun, hadiahkan buku.

Tapi Fatihah cakap tak nak bagi buku dah. Kerap sangat dah bagi buku. Mentang2 lah dia boleh buat wishlist kat mama. Tapi tak lah mama ni macam mana.. :). Kalau buat sesuatu, rasanya lagi cepat siput bergerak.

Apa2 pun, saya sedang dalam buat sesuatu yang saya perolehi ideanya dari blog kraf ni; All About Ami. Banyak projek yang menarik yang dia kongsikan kat laman webnya tu.

Kita tengok nanti, macamana hasilnya ya.. Harap2 sempat siap dan selamat sampai ke tangan bakal tuan punya yang bertuah tu.. :)

Wednesday, 12 October 2011

Pasu mini hiasan meja


Assalamualaikum wb...

Akhir- akhir ini saya cenderung terhadap kraf dari bahan- bahan terpakai seperti cawan kertas dan cawan plastik kecil bekas promosi makanan di pasaraya.

Sebab tu lah terhasilnya bekas serba guna dari cawan kertas Starbucks hari tu.

Kali ni sedang dalam peringkat akhir menyiapkan pasu mini hiasan meja dari bekas sukatan ubat sirap. Idea buat ni saya kumpulkan dari pelbagai projek di internet. Jadi saya tak dapat bagi link sebab saya tak ada projek tertentu yang dirujuk.

Bahan2:

Bekas sukatan ubat sirap
Batang pencungkil
Plastisin
Kertas pembungkus hadiah
Mata patung
Tali kraf buku skrap
Kotak tebal
Foam kraf berglitter
 Cat poster
 Gam
Masih ada satu lagi toothpick yang belum tahu nak letak apa...


 Saya juga sedang dalam percubaan pertama mengait bekas simpan pensil dari botol minuman yogurt. Link untuk tutorial  asal projek ni boleh diperolehi di bahagian My Favourite Tutorial Link kat sudut atas kiri blog ni.
Latarbelakang adalah permainan kegemaran saya di FaceBook; Treasure Madness... :) Sambil menyelam, sambil mengait..

Harap2 kedua2nya akan dapat disiapkan dalam masa yang terdekat.

Thursday, 6 October 2011

Hadiah untuk cikgu

Assalamualaikum wb...

Hadiah untuk cikgu pelatih Fatihah yang hari ini merupakan hari terakhir mengajar.

Asalnya cawan kertas "Starbuck".

Saya gunakan kertas tisu, gam, serbuk glitter, pembungkus hadiah terpakai, bunga crochet dan butang.

Cawan Kertas Starbuck yang telah ditransform kepada Bekas Pelbagai Guna Pooh


Butang digamkan pada bunga crochet untuk hiasan


 Selamat mencuba.

Monday, 2 May 2011

rose pouch and sun hat

Assalamualaikum wb...


Percubaan kedua saya untuk menghasilkan sesuatu untuk Hari Guru anak2....

Yang ni konon2nya pouch bunga ros yang menggunakan pattern pineapple pouch tapi saya kecikkan saiz dia. Sesuai untuk telefon bimbit.


Yang ni pulak konon2nya sunhat yang saya reka berinspirasikan rose pouch tapi saya buat lebih besar dan bahagian bukaannya saya capahkan untuk menjadi penghadang cahaya matahari.


Sun hat ni masih dalam proses. Tengoklah nanti macam mana agaknya hasilnya. Yang ni pun dah berapa kali dileraikan dan buat semula. Kira Try and Error la nampaknya.

Saya cuba ke kepala Asiah tapi tak muat. Cuba ke kepala Syazwan yang berusia 6 bulan, dan nampaknya muat la pulak. Maknanya saiznya adalah untuk bayi sekitar 6 bulan. Tapi Syazwan tak boleh pakai sebab warna dan gayanya tak sesuai untuk bayi lelaki.

Untuk siapa?.... Tunggu... :)

Cukup untuk kali ni.

Salam.

Mission Accomplished

  • Bigger Stationery Pouch (Hubby)
  • Pencil Pouch (Maryam)
  • Stylish Pen Case (Hubby)

My Card Making Blog List

My Blog List