Wednesday 27 June 2012

Mama

Mama by ummufatihah
Mama, a photo by ummufatihah on Flickr.

Sketch on my car porch in front of the house by maryam. It said, ”love mama”.

How can i rub it off?
Sent from my Nokia phone

Saturday 23 June 2012

First Time Ever

Assalamualaikum wb...

My girl, Fatihah joined club at her school. Last week she was taught to do some simple sewing activity.

When she came back home, she asked me to provide her with fabrics, needles and thread. I gave all to her and that was the only thing I did. The rest was done by her own.

At the beginning, she asked me to supply her with A4 size fabrics. She did something with it and after some time asked me to give her another piece in the same size. According to her, she want to make small pillow for herself. After that she asked for some filling.

She surprised me with her first ever sewing project fully done by her own. I didnt take a look even once during the process. She did it alone in my craft room to get away from her little sister.


Not bad, I think.  She wrote her name on the pillow using marker. I suggested to her to sew it next time.

I already book a small pillow from her. Hopefully mine would be ready soon... :). I was thinking to teach her neater stitch but better not too rush. Let her explore at her own pace.

Actually I have some urgent matter to be settled during this few weeks and the month of Ramadhan will be around within less than one month, so I presumed I would be here less frequent.

Assalamualaikum and be good.

Tuesday 5 June 2012

Coin pouch

Assalamualaikum wb...

A friend of mine was complaining that she cant find coin for change because her purse doesnt have coin compartment.

I promised her to whip a coin pouch to keep her change.

So, tonight after completing my gourd pouch, I started making the coin pouch.

Using the same lime green yarn, I rely totally on my own imagination.

The base is

chain 4,
11dc in first stitch, join row
Chain 3, 2 dc in each stitch, join row
Chain 3, dc in same st,* (dc i next sti, 2 dc in nxt st) repeat *, join row
Chain 3, dc in same stitch, *(dc in next 2 st, 2 dc in nxt st), repeat *, join round

Will try to recall the pattern for body in next entry, In shaa Allah.

At first I used blue yarn as string but after second thought, I think red would add more vibrant.

Is it so?


Bitter Gourd Pouch

Assalamualaikum wb...

Still in pouch mode.

Now,  anytime I want to crochet, I will just pick the yarn and needle and start to crochet. By this, I would be able to start with something.

Planning for certain magnificent and super wonderful project and to look for the pattern in internet would ended up with no project at all.

 This one I think would be completed very soon. Mini project like this can be done when I am in the middle of doing other things with family. Not much focus is needed to do it and therefore I still can talk to the kids and have conversations with my better half .


Wip- hp pouch by ummufatihah

Maybe I can call this Bitter Gourd Pouch.. :) . Peria in Bahasa Melayu.

Sunday 3 June 2012

Tumbler cozy (wip)


Assalamualaikum wb...

My husband and I love to spend our precious time together at Starbuck. And I love to keep the plastic tumbler. Its venti size is large enough to keep our tiny teeny stuff.

The problem is the company logo. I have read somewhere in the internet that it has its own story related to paganism.

So, I have plan to make tumbler cozy for my collection to hide the logo.

Recently, i have come across a pattern to make jar cozy. Applying the same principle, I started another crochet project.

Still in WIP mode.


Friday 1 June 2012

Nokia N8 Striped Pouch

Assalamualaikum wb.. 

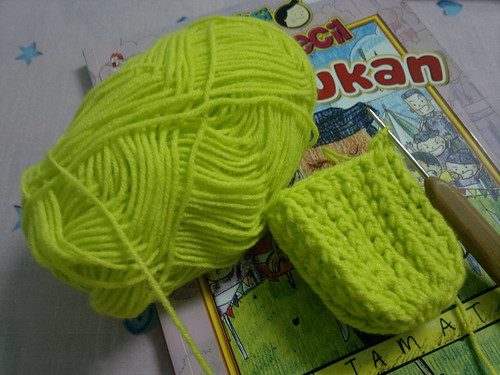
Today I made another pouch. This time I purposely made it for my Nokia N8. Even though I did not follow any specific pattern, but I am sure there are lot of similar pouches out there with patterns in the webs.

Nevertheless, I would capture my version of the pouch for my own future reference (and maybe a few others who happen to stumble upon my blog here.. ).

 
Base:
Make magic circle
chain 3 (first dc), stitch another 11 dc in the circle, join  the row (12 dc)
Chain 3, dc in same stitch, 2 dc in each stitch, join row (24 stitch)
Chain 3, *(2 dc in next stitch, dc in next stitch), repeat * until end of row, join row

Check the base with bottom of handphone. Make it  a little bit smaller than the hp, it will later getting bigger after a few more rows.


Body:

Change color
chain 3, dc in every stitch (maintaining the same stitch until you get the height that you need for your hp.

Mine reached after 12 even rows. Change the color based on your preference. I changed colour in alternate row because it was easier for me to maintain the same yarn without cutting them. I just brought back the next yarn which I left behind before the row.


When you reach the top part of the hp, decide whether you want the hp to be fully hidden or some what appear a little bit. I made my pouch exactly the same height (even though in fact mine is smaller) of my hp for easy retrieval and insert in. 

So, at after the 12 row (to fuly cover it shoould be 13 row plus edging) I start to make the edging. 

At row 13, *(slip stitch at first stitch.  Skip next stitch, 5 dc in next stitch, skip next stitch),  repeat * until end row.

To make the flap, 

There will be 4 flower edge at the back of the pouch. For row 14: sc in every stitch until you reach the middle of second flower at back part of the pouch. 

Chain around 5 stitch. Skip second half stitch of the same flower as well as the first part of the next flower. Sc the next stitch, chain 3, turn.

6dc in the space. chain 3, turn. Repeat the row until your desired length of the flap.

At the last row, turn, sc in each stitch. chain 10 or depends on what is the size of your button hole. Skip the whole stitch and sc in the last stitch in the row. 

Turn and sc in the space. Continue sc in end side of every row down to the beginning of the flap and on every stitch of the flowery edging until you reach the last stitch before end of row 14.

Now, we can start making the handle.


Chain 3 and make Foundation Double Crochet until you reach the desired length. Attach the handle to the other side of the pouch. 

(For Foundation Half Double Crochet, you can google lots of them from internet and try to apply the same concept to Foundation Double Crochet. I did found info about Foundation Double Crochet some time ago but cannot recall the site.)

 Turn and sc in each of the side of the Foundation Double Crochet until the beginning of the handle. Continue the sc until it reach the other side of the flap and sc up the flap. Slip stitch when it reach the first sc at the flap edge. Slip stitch and cut the yarn. Weave off.


As for the flower, with red yarn make a magic circle.


Chain 1 and stitch 5 or 6 sc inside the ring. Change color and join the round. Slip stitch, chain 3, slip stitch in next stitch. Repeat until you have 5 chain 3. 

Next round, slip stitch and 5 dc in the chain 3 space, slip stitch in next chain 3 space. Repeat at all the chain 3 space. Cut yarn with a few inch length of yarn left. Weave / tie the yarn loosely to the pouch.

-End-

I apologise for the difficulty to understand my write-up. My first time of complete write-up like this.

p/s: this is my second time write the entry actually. My first was not able to be published due to internet problem... Arrggghhh...


Mission Accomplished

  • Bigger Stationery Pouch (Hubby)
  • Pencil Pouch (Maryam)
  • Stylish Pen Case (Hubby)

My Card Making Blog List

My Blog List